3.10keras人民币识别

摘要

本文记录了人民币识别完整代码,在笔记本上运行效果。

GPU:2G

数据集地址:【练习赛】TinyMind人民币面值及编码识别

完整代码地址:https://blog.porterpan.top/RMBRecognition/

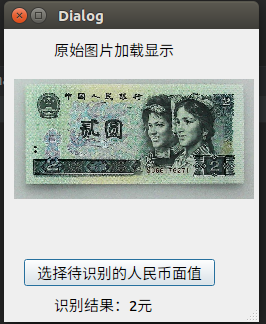
识别结果

  • [x] Edit By Porter, 积水成渊,蛟龙生焉。

步骤一、数据的整理

1
2
3
4
5
6
7
8
9
10
11
12
13
14
15
16
17
18
19
20
21
22
23
24
25
26
27
28
29
30
31
32
33
34
35
36
37
38
39
import os,shutil

face_value_label = open('./RMB_data_set/train_face_value_label.csv','r')

start_dir = './RMB_data_set/train_data/' #数据原始目录
target_dir = './RMB_data_set/mkdir_train_data/' #数据最终目录

dictionary = {'0.1':'A','0.2':'B','0.5':'C','1':'D','2':'E','5':'F','10':'G','50':'H','100':'I'}
#采用合理的名字给文件进行命名

lable_lists = face_value_label.readlines()
si = 0
if os.path.isdir(target_dir) == False:
os.mkdir(target_dir)
#如果没有目标目录,就创建一个目录

max_num = len(os.listdir(start_dir))
#获得初始文件夹中图片的数量

for li in lable_lists:
li = li[:-1]
name_label = li.split(',')
if name_label[0] == 'name':
continue #第一行数据是无效数据,不进行处理
if os.path.isfile('{0}/{1}'.format(start_dir,name_label[0])) == True:

if os.path.isdir('{0}label_{1}'.format(target_dir,dictionary[name_label[1].strip()])) == False:
# print('{0}{1}'.format(start_dir,name_label[0]))
os.mkdir('{0}label_{1}'.format(target_dir,dictionary[name_label[1].strip()]))
shutil.copy('{0}{1}'.format(start_dir,name_label[0]),'{0}label_{1}/{2}'.format(target_dir,dictionary[name_label[1].strip()],name_label[0]))
#创建文件夹并移动文件
si += 1 #记录次数
progress = (si / max_num) * 100
progress = round(progress,1)
#progress = si / len(os.listdir('./val_data_test/'))
if progress % 10 == 0:
print('成功复制{0},进度:{1}%'.format(name_label[0],progress))
#打印复制进度

步骤二、模型代码的编写

1
2
3
4
5
6
7
8
9
10
11
12
13
14
15
16
17
18
19
20
21
22
23
24
25
26
27
28
29
30
31
32
33
34
35
36
37
38
39
40
41
42
43
44
45
46
47
48
49
50
51
52
53
54
55
56
57
58
59
60
61
62
63
64
65
66
67
68
69
70
71
72
73
74
75
76
77
78
79
80
81
82
83
84
85
86
87
88
89
90
91
92
93
94
95
96
97
98
99
100
101
102
103
104
105
106
107
108
109
110
111
112
113
114
115
from keras import layers
from keras import models
from keras.utils.vis_utils import plot_model
import matplotlib.pyplot as plt
#设置文件目录

#训练集
trainDir = './RMB_train_dataset/train/' #数据最终目录
# trainDir ='H:/face_value_check/train_data/'

#验证集
# valDir = 'H:/face_value_check/val_data/'
valDir = './RMB_train_dataset/validation/' #数据最终目录

#创建模型
model = models.Sequential()
model.add(layers.Conv2D(32, (3, 3), activation='relu',input_shape=(240, 120, 3)))
#卷积层,输出空间的维数为32,也可以说是输出特征图的深度为32,提取信息的窗口大小(3,3),卷积核的大小也为(3,3)
#激活函数relu,输入图片大小(150,150,3)
model.add(layers.MaxPooling2D((2, 2)))
#池化层,窗口大小为(2,2),缩小特征图的尺寸
model.add(layers.Conv2D(64, (3, 3), activation='relu'))
model.add(layers.MaxPooling2D((2, 2)))
model.add(layers.Conv2D(128, (3, 3), activation='relu'))
model.add(layers.MaxPooling2D((2, 2)))
model.add(layers.Conv2D(128, (3, 3), activation='relu'))
model.add(layers.MaxPooling2D((2, 2)))
model.add(layers.Flatten())
#扁平层,将多维的输入转化为一维的输出
model.add(layers.Dropout(rate=0.5))
#这个层是可以删掉的,主要用来防止过拟合,放着也没事
model.add(layers.Dense(512, activation='relu'))
#全连接层,将提取的特征组合,得出结果
model.add(layers.Dense(9, activation='softmax'))
#因为要得出九个结果所以最后要输出九个数

#设置损失函数,优化器,模型在训练和测试时的性能指标
from keras import optimizers

model.compile(loss='categorical_crossentropy',#因为是多标签分类,所以使用categorical_crossentropy
optimizer=optimizers.RMSprop(lr=1e-4),#这里可以设置学习率
metrics=['acc'])

#配置图片生成器
from keras.preprocessing.image import ImageDataGenerator
#将图片像素缩小为[0,1]之间的浮点数

#本次人民币面值特征比较明显,而且会摆的整整齐齐的让你识别,数据也比较多,所以不用数据增强
train_datagen = ImageDataGenerator(
rescale=1./255,
rotation_range=40,#图像随机旋转的最大角度
width_shift_range=0.2,#图片在水平位置上偏移的最大百分比值
height_shift_range=0.2,#数值位置上
shear_range=0.2,#随机错位切换的角度
zoom_range=0.2,#图片随机缩放的范围
horizontal_flip=True)#随机将一半的图片进行水平翻转

#验证集的数据不能增强
val_datagen = ImageDataGenerator(rescale=1./255)

#创建图片生成器
train_generator = train_datagen.flow_from_directory(
trainDir,#图片地址
target_size=(240, 120),#将图片调整为(150,150)大小
batch_size=10,#设置批量数据的大小为20
class_mode='categorical')#设置返回标签的类型

val_generator = val_datagen.flow_from_directory(
valDir,
target_size=(240, 120),
batch_size=10,
class_mode='categorical')

# print(valDir,trainDir)
# while True:
# a=0
#拟合模型
history = model.fit_generator(
train_generator,
steps_per_epoch=30,#迭代进入下一轮次需要抽取的批次
epochs=30,#数据迭代的轮数
validation_data=val_generator,
validation_steps=30)#验证集用于评估的批次

#保存模型
model.save('RMBRecongnition.h5')
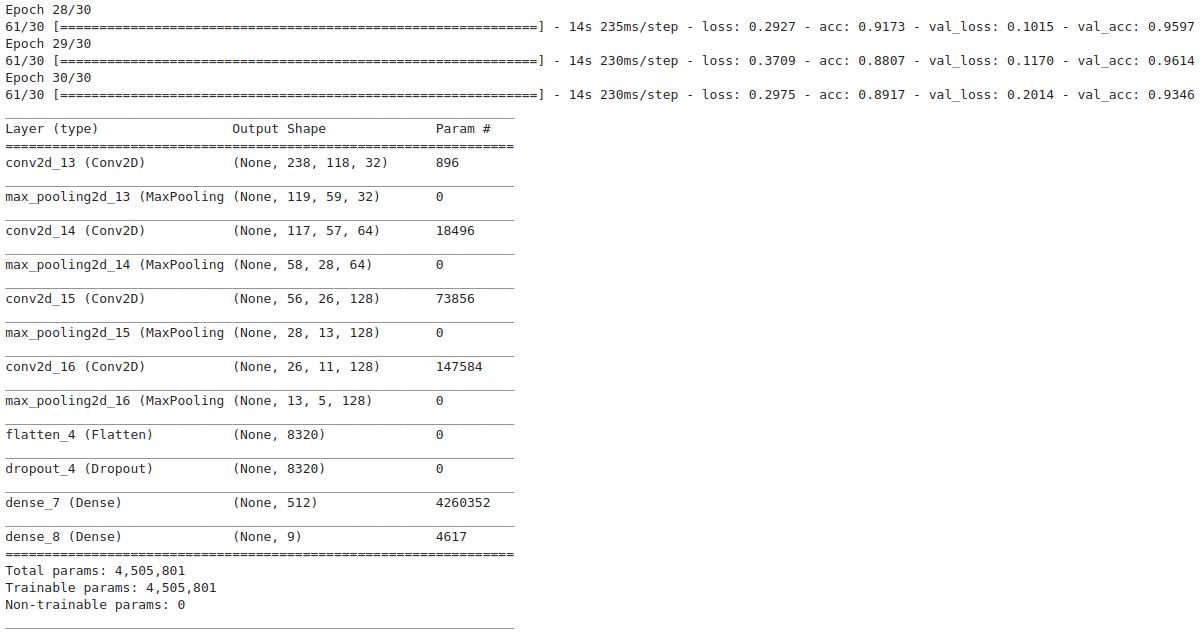
model.summary()

#画出结果
import matplotlib.pyplot as plt

#history.history中就只有这四个值,分别是准确度,验证集准确度,损失,验证集损失
acc = history.history['acc']
val_acc = history.history['val_acc']
loss = history.history['loss']
val_loss = history.history['val_loss']
epochs = range(1, len(acc) + 1)

#画两个图,分别是正确率和损失
#正确率
plt.figure(1)
plt.plot(epochs, acc, 'bo', label='Training acc')
plt.plot(epochs, val_acc, 'b', label='Validation acc')
plt.title('Training and validation accuracy')
plt.legend()
plt.savefig('acc1.png')
plt.show()
#验证损失
plt.figure(2)
plt.plot(epochs, loss, 'bo', label='Training loss')
plt.plot(epochs, val_loss, 'b', label='Validation loss')
plt.title('Training and validation loss')
plt.legend()
plt.savefig('loss1.png')
plt.show()

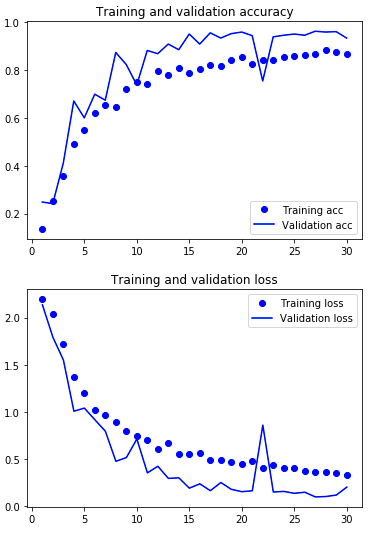
人民币识别模型训练效果

人民币识别模型巽寮效果2

步骤三、模型的加载

1
2
3
4
5
6
7
8
9
10
11
12
13
14
15
16
17
18
19
20
21
22
23
24
25
26
27
28
29
30
31
32
33
34
35
36
37
38
39
40
41
42
43
44
45
46
47
48
49
50
51
52
53
54
55
56
57
58
59
60
61
62
# %matplotlib inline#在jupyter 内部显示图片
import matplotlib
# matplotlib.use('Agg')
import os
from keras.models import load_model
import numpy as np
from PIL import Image
import cv2

import matplotlib.pyplot as plt

min_side = 150

def process_image(img):
size = img.shape
h, w = size[0], size[1]
#长边缩放为min_side
scale = max(w, h) / float(min_side)
new_w, new_h = int(w/scale), int(h/scale)
resize_img = cv2.resize(img, (new_w, new_h))
# 填充至min_side * min_side
if new_w % 2 != 0 and new_h % 2 == 0:
top, bottom, left, right = (min_side-new_h)/2, (min_side-new_h)/2, (min_side-new_w)/2 + 1, (min_side-new_w)/2
elif new_h % 2 != 0 and new_w % 2 == 0:
top, bottom, left, right = (min_side-new_h)/2 + 1, (min_side-new_h)/2, (min_side-new_w)/2, (min_side-new_w)/2
elif new_h % 2 == 0 and new_w % 2 == 0:
top, bottom, left, right = (min_side-new_h)/2, (min_side-new_h)/2, (min_side-new_w)/2, (min_side-new_w)/2
else:
top, bottom, left, right = (min_side-new_h)/2 + 1, (min_side-new_h)/2, (min_side-new_w)/2 + 1, (min_side-new_w)/2
pad_img = cv2.copyMakeBorder(resize_img, int(top), int(bottom), int(left), int(right), cv2.BORDER_CONSTANT, value=[0,0,0]) #从图像边界向上,下,左,右扩的像素数目
#print pad_img.shape
#cv2.imwrite("after-" + os.path.basename(filename), pad_img)
return pad_img

#加载模型h5文件
model = load_model("RMBRecongnition.h5")
model.summary()
#规范化图片大小和像素值
images_1 = r'./public_test_data/0A2MIKHN.jpg'

input = cv2.imread(images_1)
# input = process_image(input)
input = cv2.resize(input, (150, 150))
input = cv2.cvtColor(input, cv2.COLOR_BGR2RGB)

plt.figure("dog")
plt.imshow(input)
plt.show()

pre_x = np.expand_dims(input, axis=0)
#调用函数,规范化图片
# pre_x = get_inputs(images)
#预测
pre_y = model.predict(pre_x)
print(pre_y)
print("预测结果输出:")
# classes=['1Jiao', '2Jiao', '5Jiao', '2Jiao', '1Yuan', '2Yuan', '5Yuan', '10Yuan', '50Yuan', '100Yuan'],
# if pre_y[0] >0.5:
# print("识别结果:狗狗")
# else:
# print("识别结果:猫猫")

步骤四、模型的应用

1
2
3
4
5
6
7
8
9
10
11
12
13
14
15
16
17
18
19
20
21
22
23
24
25
26
27
28
29
30
31
32
33
34
35
36
37
38
39
40
41
42
43
44
45
46
47
48
49
50
51
52
53
54
55
56
57
58
59
60
61
62
63
64
65
66
67
68
69
70
71
72
73
74
75
76
77
78
79
80
81
82
83
84
85
86
87
88
89
90
91
92
93
94
95
96
97
98
99
100
101
102
103
104
105
106
107
108
109
110
111
112
113
114
115
116
117
118
119
120
121
122
123
124
# -*- coding: utf-8 -*-

"""
Module implementing RMBRecognition.
"""

from PyQt5.QtCore import pyqtSlot
from PyQt5.QtWidgets import QDialog, QFileDialog
from PyQt5 import QtCore, QtGui, QtWidgets

from Ui_RMBRecognition import Ui_RMBRecognition

import os
from keras.models import load_model
import numpy as np
import cv2


class RMBRecognition(QDialog, Ui_RMBRecognition):
"""
Class documentation goes here.
"""
def __init__(self, parent=None):
"""
Constructor

@param parent reference to the parent widget
@type QWidget
"""
super(RMBRecognition, self).__init__(parent)
self.setupUi(self)
self.image_resize_target = 240
self.model = load_model("../RMBRecongnition.h5")

def process_image(self, img):
min_side = self.image_resize_target
size = img.shape
h, w = size[0], size[1]
# 长边缩放为min_side
scale = max(w, h) / float(min_side)
new_w, new_h = int(w / scale), int(h / scale)
resize_img = cv2.resize(img, (new_w, new_h))
# 填充至min_side * min_side
if new_w % 2 != 0 and new_h % 2 == 0:
top, bottom, left, right = (min_side - new_h) / 2, (min_side - new_h) / 2, (min_side - new_w) / 2 + 1, (
min_side - new_w) / 2
elif new_h % 2 != 0 and new_w % 2 == 0:
top, bottom, left, right = (min_side - new_h) / 2 + 1, (min_side - new_h) / 2, (min_side - new_w) / 2, (
min_side - new_w) / 2
elif new_h % 2 == 0 and new_w % 2 == 0:
top, bottom, left, right = (min_side - new_h) / 2, (min_side - new_h) / 2, (min_side - new_w) / 2, (
min_side - new_w) / 2
else:
top, bottom, left, right = (min_side - new_h) / 2 + 1, (min_side - new_h) / 2, (min_side - new_w) / 2 + 1, (
min_side - new_w) / 2
pad_img = cv2.copyMakeBorder(resize_img, int(top), int(bottom), int(left), int(right), cv2.BORDER_CONSTANT,
value=[0, 0, 0]) # 从图像边界向上,下,左,右扩的像素数目

return pad_img

@pyqtSlot()
def on_pushButton_clicked(self):
"""
Slot documentation goes here.
"""
self.label_result.setText("识别结果: ")

images_1, filetype = QFileDialog.getOpenFileName(self, "选取文件", "./",
"Image Files(*.jpg *.png *.jpeg *.ico)") # 设置文件扩展名过滤,注意用双分号间隔
pixmap = QtGui.QPixmap(images_1)
self.label_origin_image_dis.setPixmap(pixmap.scaled(240, 120))

input = cv2.imread(images_1)
# input = self.process_image(input)
input = cv2.resize(input, (120, 240))
input = cv2.cvtColor(input, cv2.COLOR_BGR2RGB)
pre_x = np.expand_dims(input, axis=0)
pre_y = self.model.predict(pre_x)
print(pre_y)
print("预测结果输出:")

# index_get = np.argwhere(pre_y[0]==1.)[0][0]
index_get = np.argmax(pre_y[0])
# print(np.argwhere(pre_y[0] == 1.))
print(index_get)
if(index_get == 0):
out_label = "识别结果:1角"
elif(index_get == 1):
out_label = "识别结果:2角"
elif (index_get == 2):
out_label = "识别结果:5角"
elif (index_get == 3):
out_label = "识别结果:1元"
elif (index_get == 4):
out_label = "识别结果:2元"
elif (index_get == 5):
out_label = "识别结果:5元"
elif (index_get == 6):
out_label = "识别结果:10元"
elif (index_get == 7):
out_label = "识别结果:50元"
elif (index_get == 8):
out_label = "识别结果:100元"
else:
out_label = "识别结果:未识别"
print(out_label)
self.label_result.setText(out_label)

# if pre_y[0] > 0.5:
# print("识别结果:狗狗")
# self.label_result.setText("识别结果:狗狗")
# else:
# print("识别结果:猫猫")
# self.label_result.setText("识别结果:猫猫")

if __name__ == "__main__":
import sys
app = QtWidgets.QApplication(sys.argv)
ui = RMBRecognition()
icon = QtGui.QIcon()
icon.addPixmap(QtGui.QPixmap("ico.png"), QtGui.QIcon.Normal, QtGui.QIcon.Off)
ui.setWindowIcon(icon)
ui.show()
sys.exit(app.exec_())

识别结果

文章目录
  1. 1. 摘要
    1. 1.1. 步骤一、数据的整理
    2. 1.2. 步骤二、模型代码的编写
    3. 1.3. 步骤三、模型的加载
    4. 1.4. 步骤四、模型的应用
|